
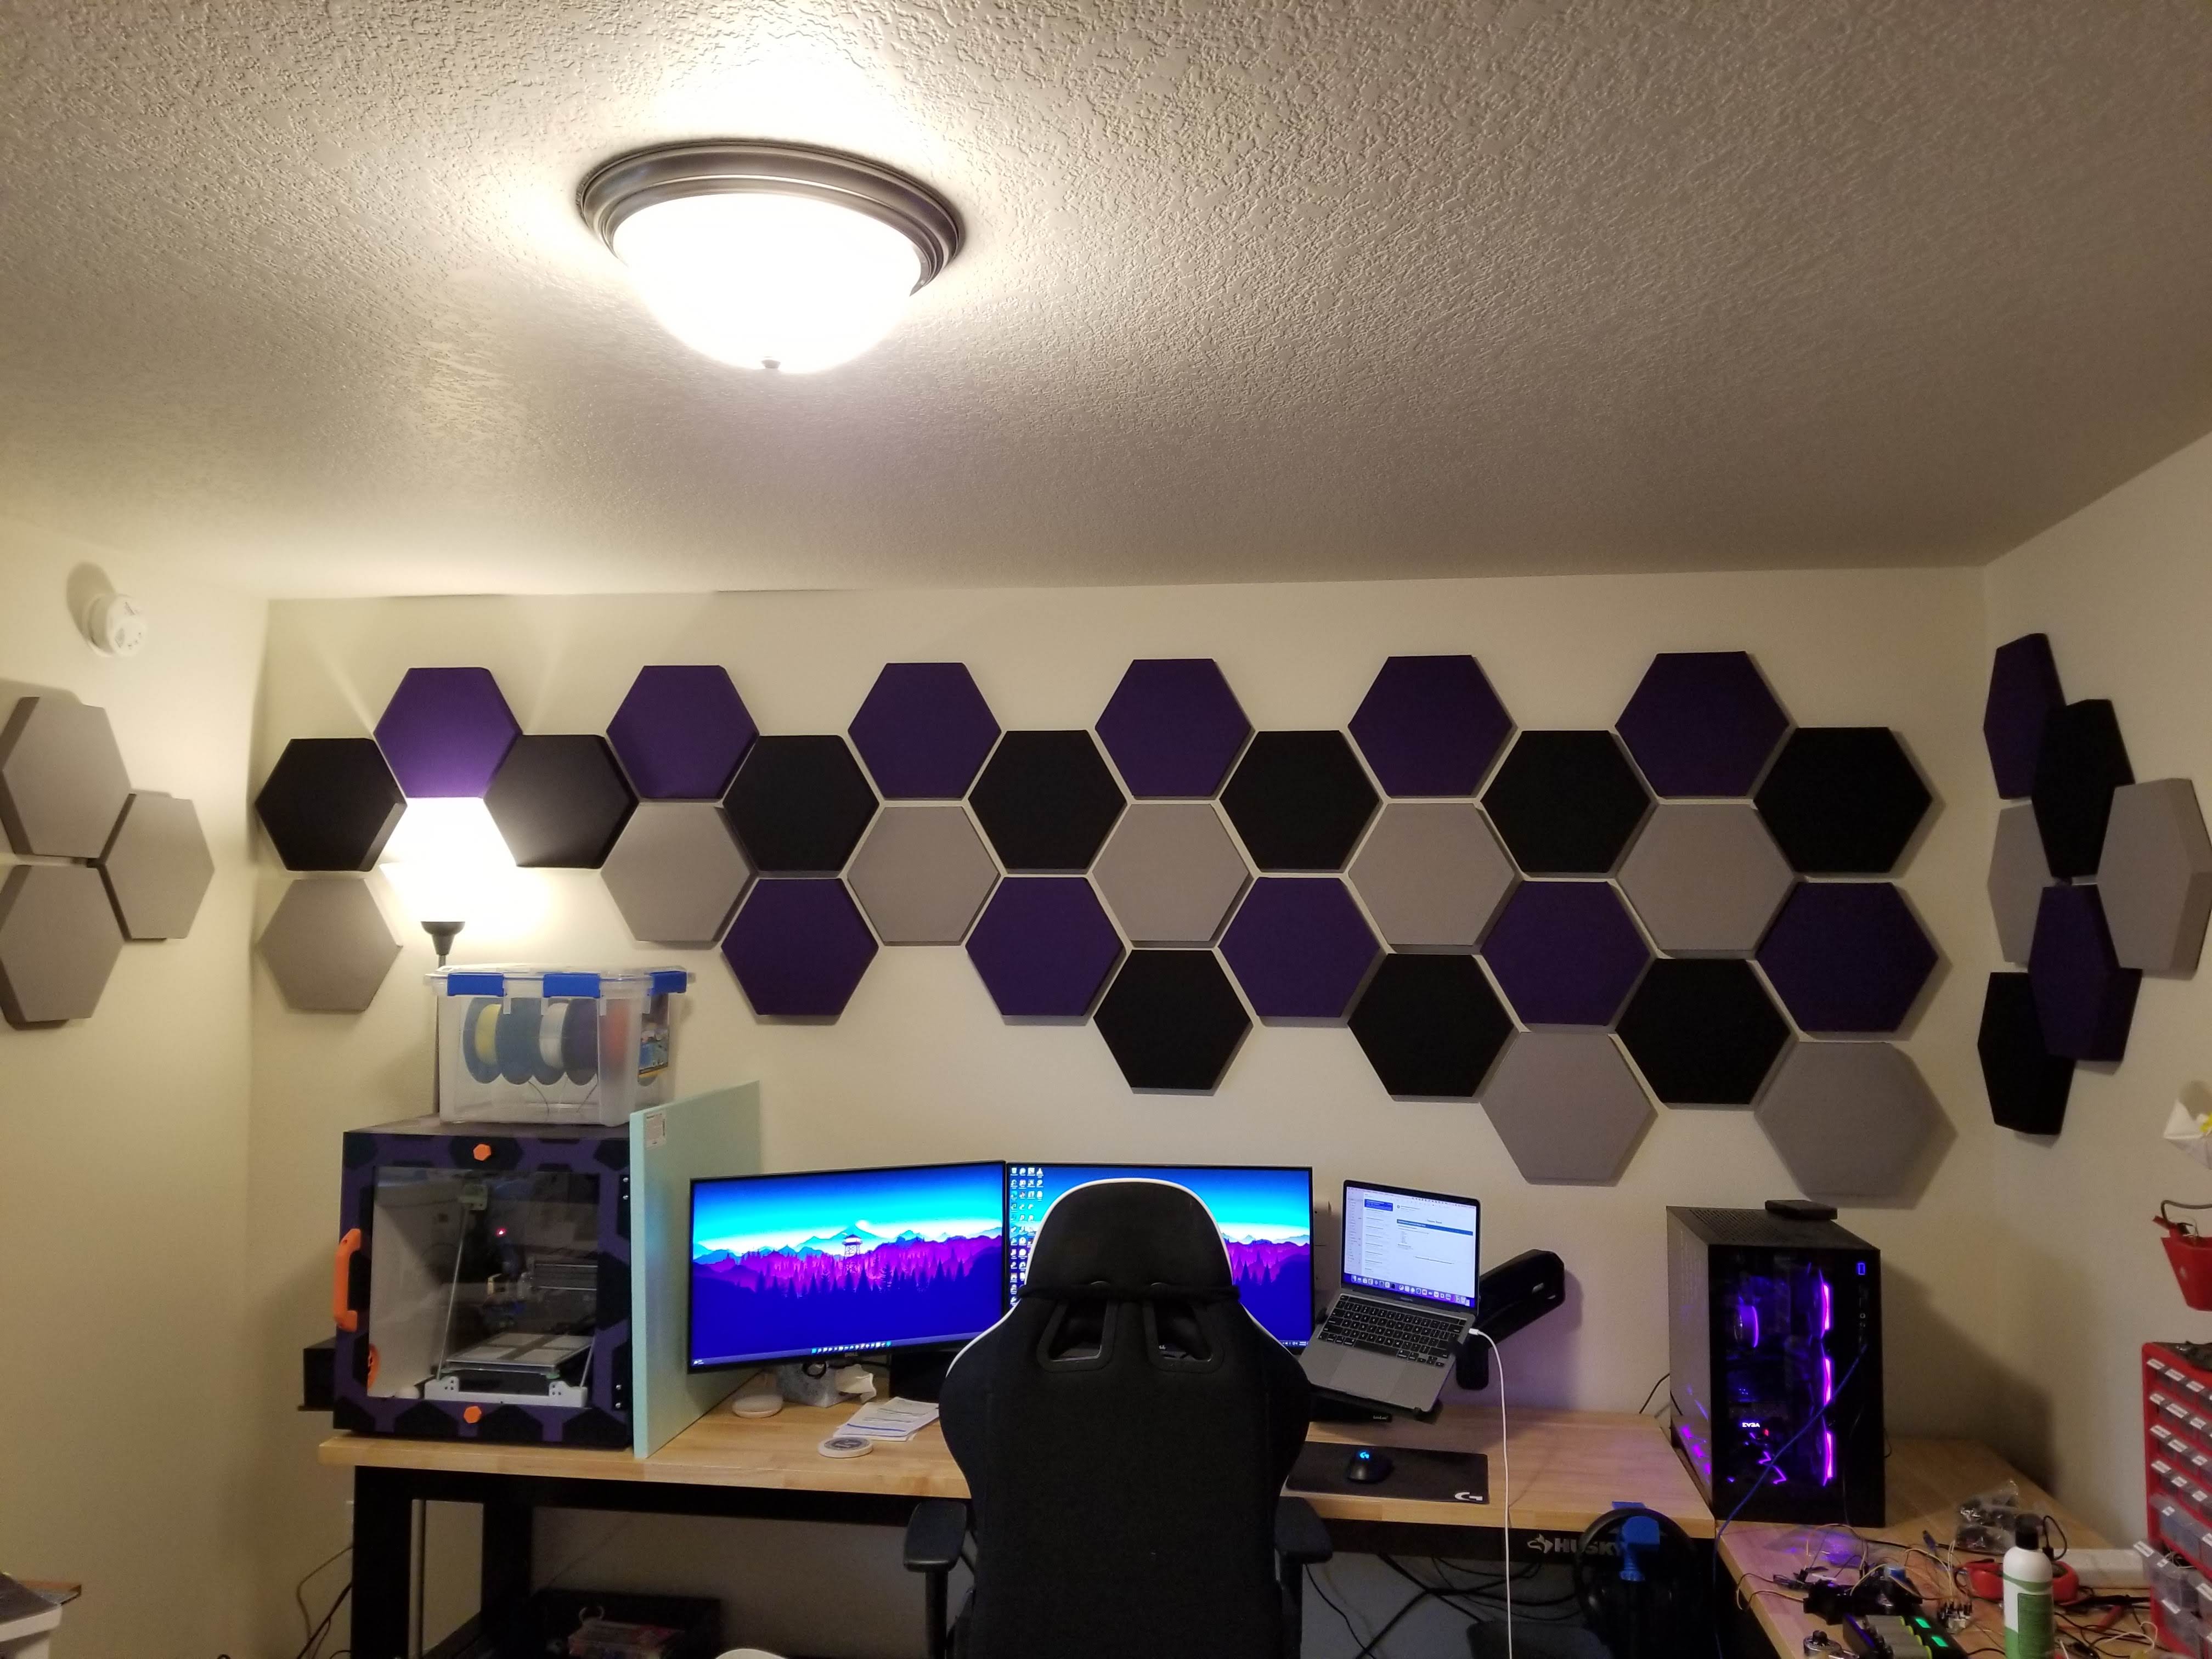
I can get quite loud playing game at night with the friend and that was a problem with a little one going to bed early. I also had a very plain blank wall that I have wanted to do something with. I decided to tackle both at once and made sound reducing acoustic hexagon shaped tiles. A main goal of this project was to use as much scrap wood that I had laying around as I had as well as any other materials to reduce the cost. My end cost was about $75. I ended up making 36, 3 different colored, 3 different depth sized hexagons (with 2 extras).
Breakdown of tile sizes:
12 of each color
- 4x 1in thick
- 4x 1.5in thick
- 4x 2in thick
Materials used:
- Purple, Black, and Gray Fabric from the fabric store.
- Wood Glue
- Hot Glue Sticks
- Scrap Wood - any thickness over 1/2 inch should work.
- Insulation - I used (https://www.lowes.com/pd/Owens-Corning-Thermafiber-Fire-and-Sound-Guard-3-in-x-15-in-x-47-in/5001729147).
- Staples
- Cardboard
- Foam tape - https://amzn.to/3jBcgWY
Tools used:
- Table Saw
- Miter Saw
- Spring Staple Gun
- Ratchet Strap
- Level
- Orbital Sander
- Machete
- Scissors
- Hot Glue Gun
- Utility Knife
I started with making a simple scaled down test version. No clamping just gluing and lightly pushing together. Wrong direction of wood in this picture.
I 3d printed these clamps to hold the wood together while it dried https://www.thingiverse.com/thing:3273824
Small test
I made 2 larger full scale versions at different sizes. Wax paper was my workbenches friend for this. 1in and 2in pictured.
Lots of cutting! I ripped scrap wood to 1in, 1.5in, and 2in on the table saw and then cut the pieces to 6.5 inches on the long side on the miter saw.
Filling some gaps in my scrap wood before sanding. I used wood filler and even some drywall spackle. It would all be hidden by the fabric anyway.
A good amount done.
For the fabric, I just cut to rough size and stapled one side then moved to the opposite as I stretched it. Moved around to each side until I was done, folding the corners at the edge. I used normal staples when I could but some wood and the corners where the fabric overlapped I had to use my bigger staple gun.
Now I had to cut some insulation. I started by using a spare hexagon as a guide. I traced the inside with an exacto knife and then used large scissors to cut it out. That worked ok but I could do better...
Enter the machete. I was able to cut the insulation much easier. I then could cut its thickness in half using either the medium or small hexagon templates. Using the medium template, I could get a insulation cutout for the large and small hexagons. Using the small template, I could get 2 medium insulation cutouts for medium hexagons.
Test fit.
To attach the cardboard to the back I used a combination of wood glue and hot glue. Wood glue in the corners and hot glue along the edges to hold it together while the wood glue dried. Was there a better glue choice? probably but this seems to work well by soaking through the fabric into the wood and adhere to the cardboard.
I added double sided foam tape to stick it to the wall. I tried about 4 different brands of foam tape and this one won out as the stickiest without ruining the wall incase I need to remove it.
|
2 Rolls Double Sided Foam Tape White PE Foam Tape Sponge Soft Mounting Adhesive Tape (1/4 inch by 50 Feet) |
https://amzn.to/3jBcgWY |
Stuck really good for its small profile. I was able to pull really hard to remove it with minimal paint damage. | |
| 2 Rolls Double Sided Foam Tape White PE Foam Tape Sponge Soft Mounting Adhesive Tape (1/4 inch by 50 Feet) | https://amzn.to/3Egjyc0 | Did not stick very well | |
| 2 Rolls Double Sided Foam Tape White PE Foam Tape Sponge Soft Mounting Adhesive Tape (1/4 inch by 50 Feet) | https://amzn.to/3xqagJl | Stuck too good. I have a whole in the paint where I pulled off my test piece. | |
|
3M Double Sided Tape, Heavy Duty Foam Tape, 33 FT Length, 0.5" Width, 1.2 mm Thick, Industrial Mounting Waterproof Tape for LED Strip Lights, Car Decor, Home Decor and Office Decor |
https://amzn.to/3uHB3Ps | Did not stick very well |
Test layout with a crude boundary to get an idea on spacing. I went with 3/4 inch spacing between the hexagons.
Laying out the hexagons on the wall. I designed a helper spacer and the combination of that and the level I was able to keep consistent spacing.
Spacer:
Fusion360 File: hexagon spacer v4.f3d
Finished! Echo noise has been drastically reduced and it turned out great!
Comments
No comments yet — be the first to comment!
Leave a comment